Showing posts with label PicMonkey. Show all posts

Tuesday, November 25, 2014

My 3 Favorite Free Editing Sites


The two photos that I'm using today (the tea set and the cactus plant), I took at Angala's restaurant. I just finished a visual 9-part series on Angala titled Boutique Hotel (Part 1 - 9). You can find the links to that series at the bottom of my post.

Original

HDR

Invert Colors

As a blogger and avid photographer, I spend a lot of time selecting and editing photos before uploading them to my blogs. Here are my THREE favorite FREE resources that I use:


I used PicMonkey to create the collage above and I used Picasa 3 for the text and photo edits.


Above is my cactus plant photo before uploading it to Canva. Below is how I used it in Canva's Blog Graphic. The text I added in Picasa 3. My favorite fonts with lots of options is in Picasa 3. But I have to convert my png image from Canva into jpg for Picasa. I do that with PicMonkey. I upload my png image to PicMonkey and save it in jpg format.


The Story of How it All Began

The Gorgeous Gardens

My 3 Girls

The Luxury Suites

Flowers at Angala

Horses at the Fence

The Eco Pool

Pets at Angala

The Lily Cottage's Garden

Wednesday, November 14, 2012

Wild Flower Time in South Africa - 8

I think that the wildflowers in today's set of photos are particularly beautiful. Two of these pictures were taken by my husband with his mobile phone, the one with Amanda on Jessica's shoulders and the other one of me with my little camera. Are you surprised that the camera in 1camera1mom is that simplistic? It does the job and Picasa and PicMonkey do the rest.


Tuesday, June 26, 2012

3 Sisters – 8

3 Sisters at the Beach 2010
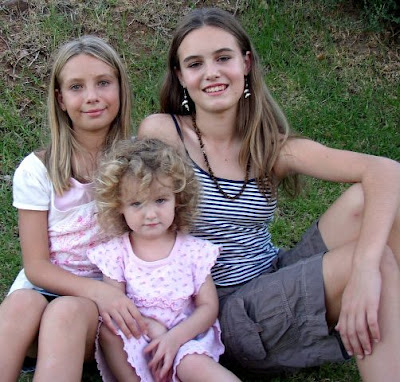
It’s late at night here, but I realize it’s about time that I add a new photo to this series. Since my series is on the 3 sisters, their brother does not feature. That doesn’t mean that he isn’t a very precious part of our family, because he is. I thought that it would be nice to do a piece on the girls, especially since I had a lot of lovely photos of just the 3 of them. Sometimes, though, Jeremiah was also in the picture. What did I do before? I cropped him out. Yep, I cropped the handsome boy out of the photo! I don’t feel too bad about it either, because I still have the originals and he’s not too keen on me posting his picture everywhere.

So, if I cropped him out before, what did I do this time? I used the Clone tool in PicMonkey and cloned small portions of the photo to make him miraculously disappear. If it wasn’t so late, and if my eyes weren’t tired, I could have done a perfect job, but this is near perfect and so I’m satisfied. This is my second time using the Clone tool on an image of mine. I also used it on my post 3 Sisters – 5. Now you know what you can do the next time you want to make something disappear or, in the case of 3 Sisters – 5, make more of something!

4 Siblings at the Beach 2010

Wednesday, June 20, 2012

3 Sisters – 7


You would think that I was clever enough to get the girls positioned just right for these two photos. Not at all! I saw them sitting like this and quickly went and grabbed my camera. Of course, they did pose a bit once they saw me with camera in hand. This is why keeping a camera or mobile phone with a good quality built-in camera nearby at all times is a good idea. It’s all about capturing the moment and making memories!

Check out my cool photo frame! I went with white, so it doesn't look as much like a frame as it does a boarder. It’s one of PicMonkey’s latest additions to their free photo editing site. Once you’ve uploaded an image to edit, click on the Frames icon to the left, scroll right down to the bottom and there you’ll find New Sketchedy. Try out their different options in Sketchedy. There are a variety of choices, so have fun checking them out!

Monday, June 18, 2012

3 Sisters – 6

With eager expectation, I awaited for PicMonkey’s collage application. It’s been available for a few days already, but I hadn’t gotten around to trying it out. It didn’t disappoint.

You can create your own collage in seconds, literally, and for free using PicMonkey. Without any prior knowledge on how to use this application, I got this result with a few simple clicks. I didn’t even bother editing my photos and my collage turned out awesome!

2010 Soccer World Cup, South Africa

Here are the steps I took: I clicked on Collage, three empty frames appeared, which I rotated with one click below the frames. I then clicked on the blue box with Upload Photos to the left, and chose my three pictures from my documents. I then dragged them over to the empty frames by clicking on the mouse and holding it down. I placed them where I wanted them to be. I clicked on the paint palette, wondering what it was for, and saw that it changes the background color. I chose the dropper and picked a color from my photos to replicate. I liked the green in Jessica’s T-shirt and went with that. My final step was to save it in good quality, not best quality as I hadn’t resized my photos earlier and didn’t want a large file size. That’s because I don’t want to upload large file size images on my blogs or else my blogs will load slower.

Friday, June 15, 2012

3 Sisters – 5

This photo of my 3 girls has been edited.

There’s really no reason why you have to put up with an over-exposed image, red-eye or whatever else. The photo editing tools that I’ve been mentioning, Picasa 3 and PicMonkey, are for free and easy to use. Some things just take time to get the hang of them. The best way to learn is by playing, so play with a copy of your photo (not the original) and see what you discover. I may have over-colored this photo, but I have a weakness for color. I love all colors, maybe that’s one reason why I like diversity in ethnicity, because the more colors the better! I live in the Rainbow Nation of South Africa and my family does not stick to one culture or ethnicity. My husband and I are a mix of cultures, even though we are both white, and we have had to learn to get along.

I went all out with this image. One editing tool that I used was Clone in PicMonkey. That is how I got all the grass to be green. Once I had what I wanted in PicMonkey, I went to Picasa 3 to add my text (I like to keep the font the same and the one I’m using is in Picasa, plus I like its text features). Seeing the photo in Picasa, I began to play some more with the editing tools. When you apply different techniques, it’s called layering. You can add any number of layers to your image. Learn while playing. That’s my motto for today!

This photo of my 3 girls has not been edited.
You can see the difference for yourself.

Thursday, June 14, 2012

3 Sisters – 4


I find editing my pictures very relaxing after a busy day. It’s my way of having some me-time and a bit of fun. In these two photos my 3 girls are watching TV, and Amanda is snacking on apple slices. It looks like it was a long day for the two big sisters.

I did most of my editing in PicMonkey. One feature that I used in the background was Burn and I chose Dark. I wish you lots of success with your pictures at home. There’s no reason why you can’t take a good photo and make it a great photo! And, have fun while you’re at it!


Friday, May 25, 2012

Climbing Rocks – 2


I love the composition of this photo. The kids are all doing something different, yet they’re in the same spot on the rocks. Samantha is looking especially adorable with her hands holding the rim of her sun hat. The rocks also make a stunning backdrop. I didn’t compose the shot. I just captured the moment.

Do you want to apply free and easy photo editing tools to your pictures? I used PicMonkey for this picture and the previous one. They allow me more options to adjust a technique than Picasa 3. I hardly needed to edit these. All I did was open the Exposure tool and then I had the option to choose Auto Adjust or to use the slide bars and do it myself. The options on the slide bars are: Brightness, Highlights, Shadows and Contrast. That’s it!

Monday, May 7, 2012

Amanda Sleeping – 4

This is a very recent photo of Amanda and my last one in this series. I used PicMonkey to edit this picture. They keep adding new features. One of them is Photo Corners and I used that application here. It gives my photo that scrapbooking look. In a sense, my photography blog is my digital scrapbook. All of PicMonkey’s features are free at the moment, so now is a great time to give PicMonkey a try. I’m very happy with my font in Picasa 3 for this blog and so I used theirs, although PicMonkey has really cool font applications to choose from.


Here is the image cropped with no photo editing. She looks like a sleeping angel. Which of these two images is your favorite? The question: to edit or not to edit. I’d love to hear from you. Also, make sure you check out my parenting blog at Amanda’s Books and More where you’ll find lots of fun things to read and be inspired.

Saturday, May 5, 2012

Amanda Sleeping – 2

I used to get upset when my roll of film was developed and the colors came out wrong. Some shops developed your film using the right “mix” for the type of film it was. For example, Kodak film got a different treatment to Fuji film. I was otherwise at the mercy of whoever developed my film. All of that has changed now with the digital world we live in. I don’t have to get upset, because I can use either Picasa or PicMonkey for free and change my colors all I want. Today I’m posting an unedited image and an edited image and you can see for yourself the difference between the two.

This picture of Amanda sleeping was taken in 2011. She arranged her dolls like that with her favorite broken Baby Born swaddled up and Piglet. To me it looks as if she was one of the dolls, she’s so cute.

Related stories:


Friday, April 13, 2012

Kids with Animals – 14


This photo was taken in October 2011 and Amanda was greeting this dog for the first time. I got two really nice pictures of her interacting with the dog that I’m going to post the second one tomorrow. In both photos Amanda turned out a little blurry, but the special effect called Lomo in PicMonkey and Lomo-ish in Picasa 3 helped to mask this.

This photo was taken on an outing where we chose to only bring Amanda along. You can read more about this outing and why we didn't bring the other kids along at Family Outings

Thursday, April 5, 2012

Kids with Animals - 6

I’ve been having a lot of fun with this series of photos. This picture of Samantha with our puppy Sasha was taken at the same time as the one with Jeremiah and our puppy Benny. The puppies were an orphaned brother and sister, which we adopted from our local animal shelter. We don’t have Sasha anymore. We gave her to an elderly couple who adored her and gave her the affection she craved.

How to Edit a Photo Using PicMonkey:
This photo was edited using PicMonkey. I clicked on Exposure and reduced brightness. Then I went to Colors and slightly increased the saturation and temperature. I noticed there was a stain on Sammy’s shorts, so I chose the lipstick icon to the left and clicked the Blemish fix a couple of times at that exact spot. Satisfied with my results, I saved it.

Now that I know there are great editing tools out there, I’ll have less regrets with the photos I take. I wish you joy in taking pictures of your kids and lots of fun editing them too.

Wednesday, April 4, 2012

Kids with Animals - 5

Yesterday, I didn’t have much time to photoshop Jessica with the kitten, so I chose one effect (one click) and presto… I was done. Today, I took my time trying out the different special effects by PicMonkey. They certainly have a variety of editing tools available. So, before I tell you what I used on this picture, I thought I’d let you take a guess first. What do you think?

Well, I got both my husband and my son involved in helping me choose just the right effect. In the end, we all agreed that none was best. That’s right… I didn’t use anything. The only thing I did to this photo was to crop it, resize it smaller and add text. The lesson in this is that sometimes it’s too easy to get photoshop happy, forgetting that the original is sometimes the better choice.

This photo is of my son, Jeremiah, and our puppy, Benny. It was taken in 2005.

Monday, April 2, 2012

Kids with Animals - 3

I decided that it’s time I edit one of my photos using PicMonkey, a fantastic new online photo-editing program brought to us by the creators of Picnik. Since it’s this team’s second time around, they’ve improved the experience and they’re even in the process of adding more editing tools like “collage.” How cool is that?

I'm going to walk you through the steps of how to turn a blah photo into an awesome photo. I took this picture of Jessica and Samantha in 2007 with Jessica holding the rabbit. If you look closely, you’ll see a male peacock in the background. The lighting was poor (it was taken at dusk), so the shutter speed on my camera was slow making the images fuzzy. Thank goodness for great editing tools. PicMonkey’s slogan is, “Your photos could get awesome. We’re just saying.”

How to Edit a Photo using PicMonkey:
So, how did I apply some of that awesomeness here? I first cropped the photo, then applied sharpen and clarity (only a little bit, otherwise the picture turns too grainy). Next, I resized it (for this photo blog I use web large) and with “keep proportions” I typed 600 in the first rectangle and the second rectangle’s number adjusted itself automatically. Always remember to save/apply each step as you add a new technique to your image. I then went to colors and added a bit of saturation and temperature.

On the side bar to the left are more options. I chose effects (the chemistry beaker) and used cross process in green. I felt that this was the best option for this picture. I then went back to the side bar and chose text (the letter P). I couldn’t get the same text that I normally use for my images on this blog, so I went with Francois One and used lighten with a light peach color. Finally, I saved my image in best quality 10 since I had already resized the photo and didn’t want to reduce the quality further. That's how I turned a blah photo into an awesome photo!

For more about PicMonkey, go to my post "Being Herself - 4."

Since posting this, PicMonkey has changed the way to save a photo. When you click on the Save button, you will see a rectangle with three categories: Mel, Ewan and Russell. If you choose Mel, you will save your photo in a tiny file size. If you choose Ewan, it will be a good file size. If you choose Russell, it will be a large file size. Since I usually have already re-sized my photos before saving, I would go with Russell, just so that I don't lose quality.

Wednesday, March 28, 2012

Being Herself - 4

In this series of “Being Herself,” I have attempted to choose photos that best depict Amanda’s inner soul. In this shot, Amanda is 2 years old. As you can see, she’s making a study of the white roses by plucking the petals and smelling them. In order to create this photoshopped effect, I used Picnik. For this one I used Sharpen, Clarity, Boost, Matte and Text. I also posted another one of Amanda on her blog, a photo that I took of her today, where I used Stickers.

As you probably already know, Picnik will be closing on the 19th of April since Google is the proud new owner of these great editing tools. The cool thing is that Google has generously unlocked their premium features for the non-paying public to also enjoy.

Something you might not know is that the creators of Picnik have a new free on-line photo editing program called PicMonkey. It’s already been highly recommended by people who love Picnik. I’m sure that I will also use PicMonkey in the future. I have given it a try and it’s easy to use. I first heard of PicMonkey through Jonathan at Blogging Your Passion. I also added a review by Yahoo! for those who want to learn more.


Total Pageviews

Recommended Sites

To be added

Recommended Galleries

To be added